Introduction
I just completed setting up my Mac for Appium and wanted to share my findings with all. Unlike Windows, the steps to setting up Mac machine for iOS devices is not that easy. We will see the complete steps required in order to get us ready for iOS testing with Appium on Mac OS X.
What do we need for iOS Automation?
Now we will see what steps we need to follow, so make sure you are following it properly.
Step 1: Needs Mac OS X
iOS Automation with Appium can only be done on Mac OS X machine so it is advisable to upgrade the OS to the latest version (which in my case is 10.12 Seirra). This can be done from the App Store.
Step 2: Create Apple Developer ID
Now you need to create your Apple Developer ID. This is required in later steps.
Step 3: Install XCode
Install the latest version of XCode available in App Store.
Step 4: Install Homebrew
Homebrew is an easy to use utility to install packages on our Mac. You need to just enter the following command in the terminal, and hit return.
/usr/bin/ruby -e "$(curl -fsSL https://raw.githubusercontent.com/Homebrew/install/master/install)"
Step 5: Install NodeJS
Instead of using brew to install NodeJS, it is advisable to use installer package for the latest version available here for installing NodeJS. It is a simple user friendly installer which will guide you in installation process.
Step 6: Install Appium Command Line tool
To install latest version of Appium, you need to execute the following command in the terminal.
$ npm install -g appium
Step 7: Download Appium Desktop
Next, download the latest version of Appium Desktop available here. We will see in detail how to use this tool later.
Step 8: Install ideviceinstaller
Install the latest version for ideviceinstaller by executing the following command in the terminal.
$ brew install ideviceinstaller
Step 9: Install ios-deploy
Install the latest version for ios-deploy by executing the following command in the terminal.
$ npm install -g ios-deploy
Step 10: Install carthage
Install the latest version for carthage by executing the following command in the terminal.
$ brew install carthage
Step 11: Navigate to the bin folder
From terminal, run the following command to navigate to the bin folder where Appium is installed.
$ which appium
$ cd /to/the/path/returned/above
$ cd ..
Step 12: Install Appium XCUI Driver
Install the latest version of appium-xcui-driver by executing the following command in the terminal while being on the path from the previous step.
$ npm install -g appium-xcuitest-driver
Step 13: Finding device UDID
Connect the device to the machine via USB, then open XCode. Navigate to the menu Window → Devices. Then select your device from left panel.
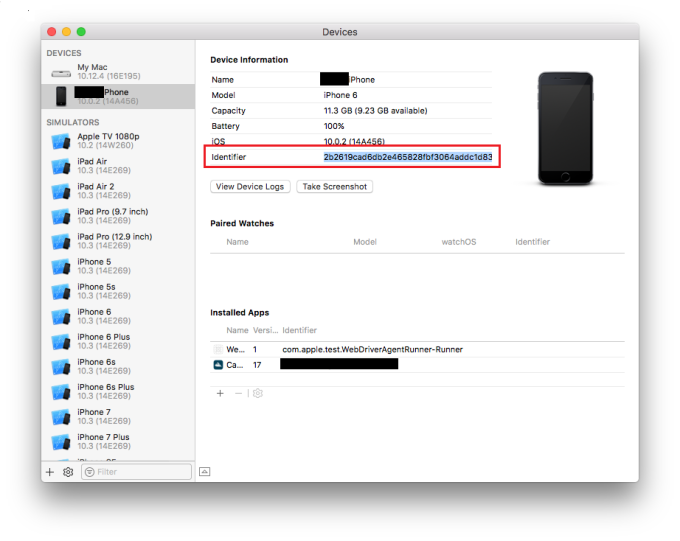
Once you select your device, you should see the details as shown, You need to save the device identifier for later use.
Step 14: Open WebDriverAgent project in XCode
In order to open the project in XCode, execute the following set of commands in the terminal.
$ cd lib/node_modules/appium/node_modules/appium-xcuitest-driver/WebDriverAgent
$ open WebDriverAgent.xcodeproj
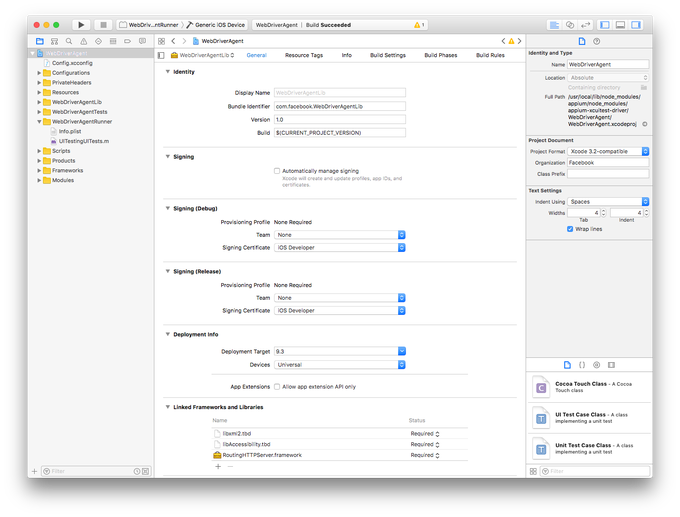
A window like this will open up.
Step 15: Enable Automatic Code Signing
We need to enable Automatic code signing and deploy the runner project on the device. This can be illustrated as below.
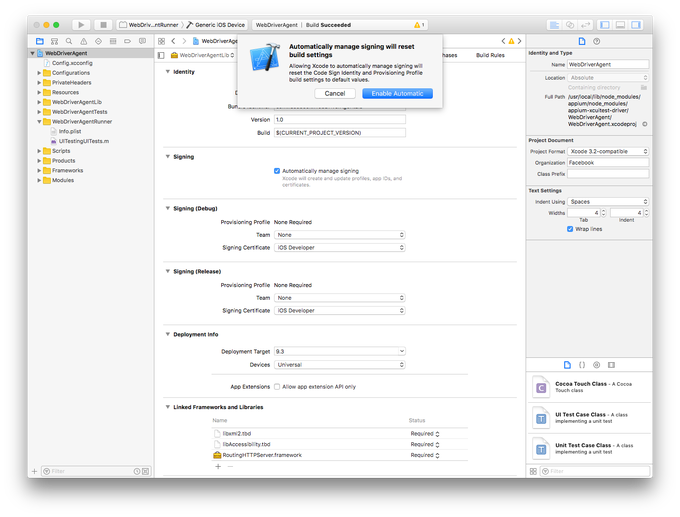
First, we will select WebDriverAgentLib, and select Automatically manage signing. A pop-up will appear, click on Enable Automatic.
Once you enable Auto signing, you will see Team drop down, there you need to select your Apple Developer Account from the list.
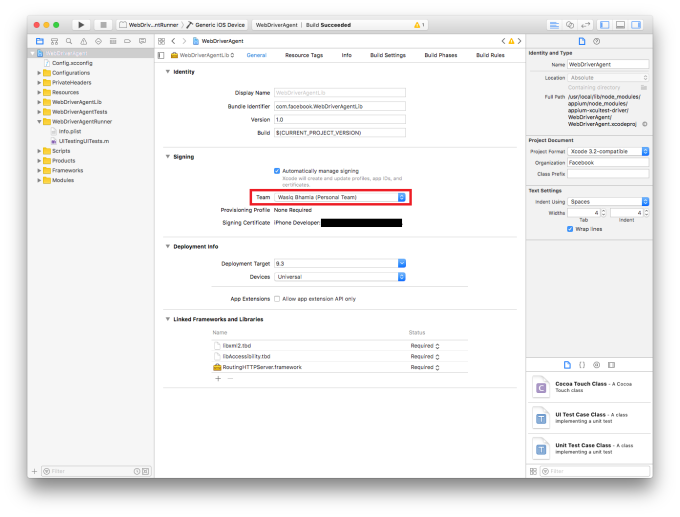
This is shown as illustrated above.
Now, select WebDriverAgentRunner from the Target list, and enable Automatic signing as done earlier. But this time you will see an Error as shown below.
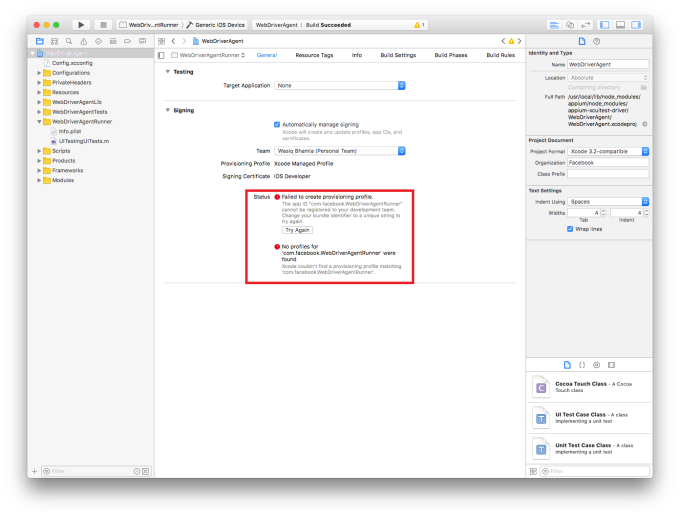
In order to solve this Error, you need to modify Product Bundle Identifier under Build settings tab from com.facebook.WebDriverAgentRunner to something unique as shown below.
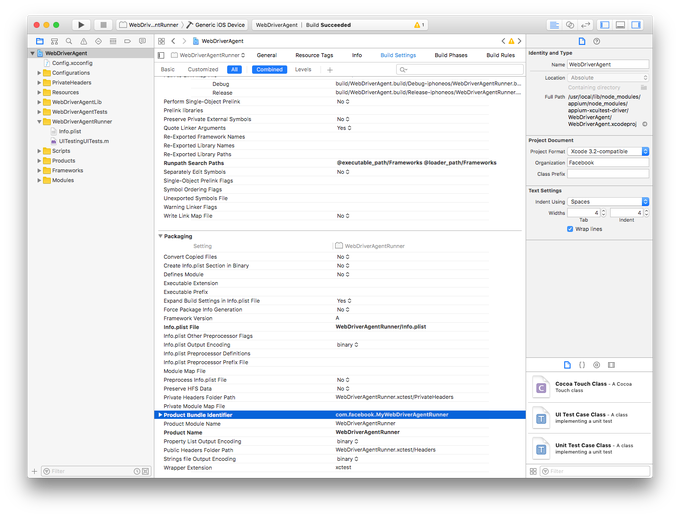
Now, again go to General tab to check the Error. Now you will notice that the Error is gone. Same can be seen below.
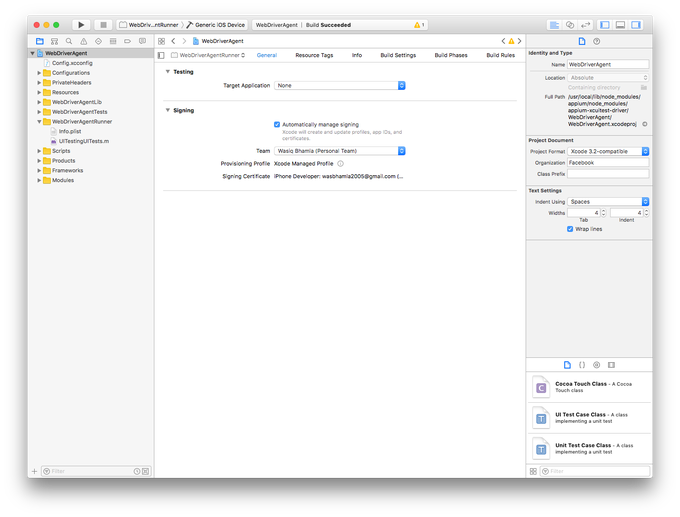
Now once, all is set we need to build the project from within XCode by clicking the play button on the top.
Step 16: Building WebDriverAgent from Terminal
Before building the project, make sure the device is plugged in to the system and you have your device UDID with you, execute the following command in the terminal.
$ mkdir -p Resources/WebDriverAgent.bundle
$ ./Scripts/bootstrap.sh -d
Once above commands are executed, now execute following build command
$ xcodebuild -project WebDriverAgent.xcodeproj -scheme WebDriverAgentRunner -destination 'id=<Device Id>' test
First time when you build the project, a WebDriverAgentRunner app will be installed on the device, and the build will fail with following Error.
Testing failed:
 Test target WebDriverAgentRunner encountered an error (Early unexpected exit, operation never finished bootstrapping - no restart will be attempted)
** TEST FAILED **
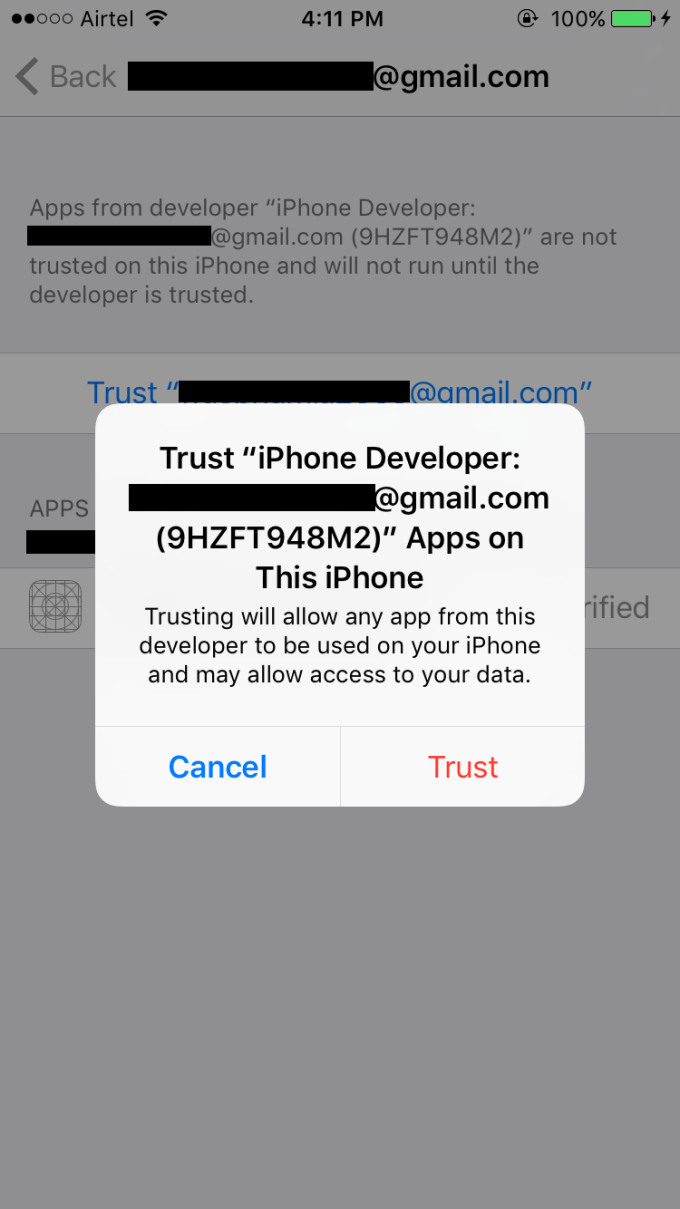
To solve this Error, we need to navigate to Settings ⇒ General ⇒ Device Management ⇒ , and trust the developer as shown below.
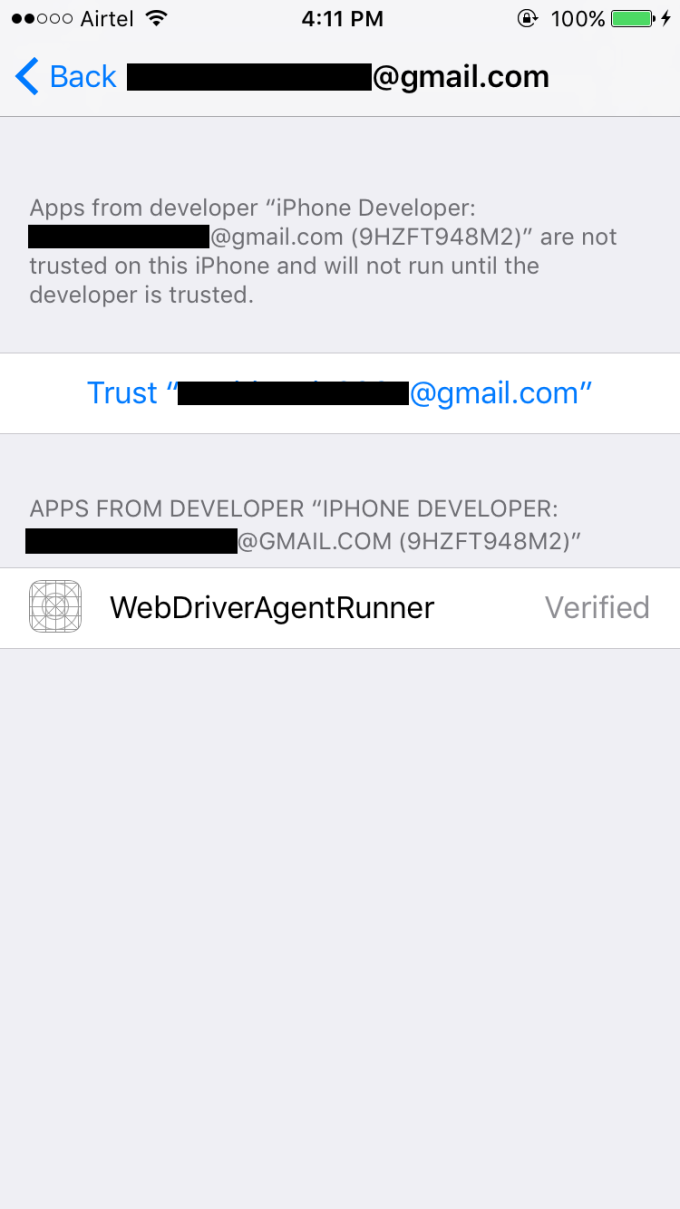
When you click on Trust button, a pop-up confirmation dialog will appear as shown below.
Now, again, if we build the project using the above command, the build will pass and a server will be started. We can confirm it by seeing the build output.
2017-04-24 16:41:06.470869 XCTRunner[459:77583] Running tests...
2017-04-24 16:41:07.379622 XCTRunner[459:77583] Continuing to run tests in the background with task ID 1
Test Suite 'All tests' started at 2017-04-24 16:41:08.061
Test Suite 'WebDriverAgentRunner.xctest' started at 2017-04-24 16:41:08.063
Test Suite 'UITestingUITests' started at 2017-04-24 16:41:08.064
Test Case '-[UITestingUITests testRunner]' started.
 t = 0.00s Start Test at 2017-04-24 16:41:08.067
 t = 0.01s Set Up
2017-04-24 16:41:08.077064 XCTRunner[459:77658] [User Defaults] Failed to write value for key AutomationDisableFauxCollectionCells in CFPrefsPlistSource (Domain: com.apple.Accessibility, User: kCFPreferencesCurrentUser, ByHost: No, Container: (null)): setting preferences outside an application's container requires user-preference-write or file-write-data sandbox access, switching to read-only
2017-04-24 16:41:08.079603 XCTRunner[459:77583] Built at Apr 24 2017 15:57:52
2017-04-24 16:41:08.115981 XCTRunner[459:77583] ServerURLHere->http://192.168.0.104:8100<-ServerURLHere
To be 100% sure if all is well with setup until now, open a separate terminal window and execute following set of commands.
$ export DEVICE_URL='http://192.168.0.104:8100'
$ export JSON_HEADER='-H "Content-Type: application/json;charset=UTF-8, accept: application/json"'
$ curl -X GET $JSON_HEADER $DEVICE_URL/status
You should see the following output
$ curl: (6) Could not resolve host: application curl: (6) Could not resolve host: accept curl: (6) Could not resolve host: application { "value" : { "state" : "success", "os" : { "name" : "iOS", "version" : "10.0.2" }, "ios" : { "simulatorVersion" : "10.0.2", "ip" : "192.168.0.104" }, "build" : { "time" : "Apr 24 2017 15:57:52" } }, "sessionId" : "9F5D94DA-8F60-4A9F-9871-EFCE7F847D8E", "status" : 0 }
Conclusion
Phew!! That was a lot of steps we did in this post. Congratulations on setting up your machine for iPhone Automation with Appium. In the next post, we will see how to identify Elements in the iPhone app and lot more. Until then, happy testing!!!
If you find this post useful, than share it with your colleagues and friends. If you have any questions or suggestion or feedback, you can share it with me in the comments section.
